Getting ready
All the scripts that we will use while learning CSS are in classpak2.zip.
The following videos go over material that we will use:
- Image Formats: Understanding images (7-1/2 min), by Liz Jamieson
- CSS: Learn CSS in 12 minutes, by Jake Wright
Connecting HTML and CSS
Let’s go over Cascade Style Sheets (CSS); we will use them to add the style to the HTML content of our fan webpage that we started last week. Content – defined by HTML – includes things like titles, text, images, and links; style – defined by CSS – includes things like font families, image and font sizes, and background colors and patterns. We modify the style of some content when we modify its appearance.
Let’s go over an example; consider some content, like a line of text, that reads:
I’m red
created with this script:
<!-- filename: red.htm -->
<!DOCTYPE html>
<html>
    <head>
    <head>

    <body>
        <p>I'm red
        </p>
    </body>
<html>
that we can see in action here. We would like to color the word ‘red’, to emphasize it, like this:
I’m red
To do this we need to apply the following CSS style to the word ‘red’:
style="color:red"
In CSS jargon, ‘color’ is the property that we want to set and ‘red’ is the property value that we want to set it to. Although we could apply the style to the paragraph <p>I’m red</p>, this would color all the words of the element, i.e., ‘I’m red’, but we only want to color the word ‘red’. Thus, we need to place the word ‘red’ in its own element, with a <span> tag:
<p>I'm <span>red</span>
</p>
Now that we have isolated the word ‘red’ in its own element, let’s look at the three ways that we could use to change the style.
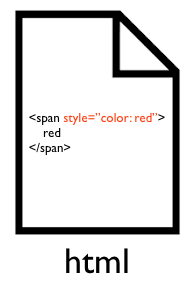
Inline style
The first way in which we may apply a style to an element is to add the style to the opening tag of the element, inline, in the html file. Inline style is convenient when we need to change something small, or only for a moment. However, it mixes content and style so it is difficult to debug, and it’s time consuming to apply and to modify.
Still, for this small example, the inline style works well. All we need to do is to add the style to the span element that contains the word ‘red’:
<p>I'm <span style="color:red">red</span>
</p>
so we modify our script like so:
<!-- filename: red_inline.htm -->
<!DOCTYPE html>
<html>
    <head>
    <head>

    <body>
        <p>I'm <span style="color: red">red</span>
        </p>
    </body>
<html>
We can see the script in action here.
External style sheet
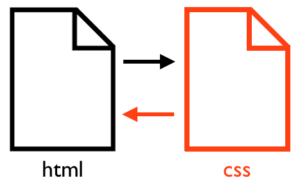 A second way to apply the style to our element is to keep the content in the html file but move the style to an external css file. This works well when different people work on different aspects of the webpage, e.g., a writer works on the content, and a graphics designer on the style; in this case, each person modifies only one file. External style sheets also work well when the same webpage can have different ‘skins’; changing the ‘skin’ of the site would only require changing the style sheet.
To get an external style sheet to work we need to create connections between the html and the css file. In the head of the html file, we create a link to the css file that we are going to use, e.g., ‘style.css’. Also, in our example, it is a good idea to give an identification to the element that we are going to change, e.g., we give the span that we want to change the id ‘red_text’:
<!-- filename: red_external.htm -->
<!DOCTYPE html>
<html>
    <head>
        <link rel="stylesheet" type="text/css" href="style.css">
    <head>
    <body>
        <p>I'm red</span>
        </p>
    </body>
<html>
Now we create the file ‘style.css’, and indicate that we want to set the ‘color’ property of the element with identification ‘red_text’, a.k.a. the selector, to the property value ‘red’:
/* filename: style.css */
/* set color of element with id "red_text" to red */
#red_text {
    color: red;
}
We can see these scripts in action here.
We use selectors to target the elements that we want to change. Selectors can be the element name (e.g., ‘h1’), the element id (e.g., ‘#red_text’), the element class (e.g., ‘.my_class’), and others.
Internal style sheet
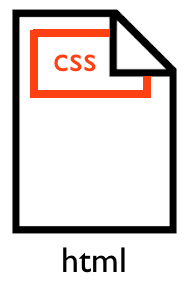 The third way to apply the style is to move all the css style inside the head of the html file.
This way to apply the style is a tradeoff between the inline style and the external style sheet. It separates the content from the style but it only works for a single html file. Also, it works best when a single person is working on the webpage.
All we need to do is to move the style from the external style sheet to the head of the html file, and set is as the content of a <style> element:
<!-- filename: red_internal.htm -->
<!DOCTYPE html>
<html>
    <head>
        <style>
            /* set color of element with id "red_text" to red */
            #red_text {
                color: red;
            }
        </style>
    <head>

    <body>
        <p>I'm red</span>
        </p>
    </body>
<html>
We can see this script in action here.
Summary
The different ways to apply styles cater to different type of projects:
- inline style: it’s good for small single-person projects that needs small or temporary changes
- internal style sheet: it’s good for one/multiple-person single-page projects that have a single style all the time
- external style sheet: it’s good for one/multiple-person single/multiple page projects that might have more than one style
Although our fan webpage is a single-person project, we are really working as two different people: a writer that writes the content, and a graphic designer that works on the style. Even though we are done with the content, and now we only need to work on the style, let’s separate content from style and use a external style sheet; this will help us to keep our project organized.